Your Internet Patient Account (IKP, Internetowe Konto Pacjenta) holds your e-prescriptions, e-referrals and information about treatment in different facilities. When you share it with our clinic or with a chosen doctor, the doctor sees during the visit which medicines you take and which tests you have had. This makes it easier to choose the treatment and to avoid dangerous drug interactions.
It takes a few minutes. Sharing is voluntary and you can withdraw it at any time. Choose how you want to do it:
The IKP is available in Polish only, so the button names below are given in Polish with a translation.
First decide who gets access. Access for a facility is given to all its medical staff — choose it when several of our doctors treat you. Access for a doctor is given to that one person only.
Instructions for a browser on a computer. The screenshots come from the Centrum e-Zdrowia manual of April 2026; we replaced the doctors’ names with sample names.
Go to pacjent.gov.pl and click “Zaloguj się” (log in). Log in with a trusted profile (profil zaufany), an e-ID card, the mObywatel app or your online bank.
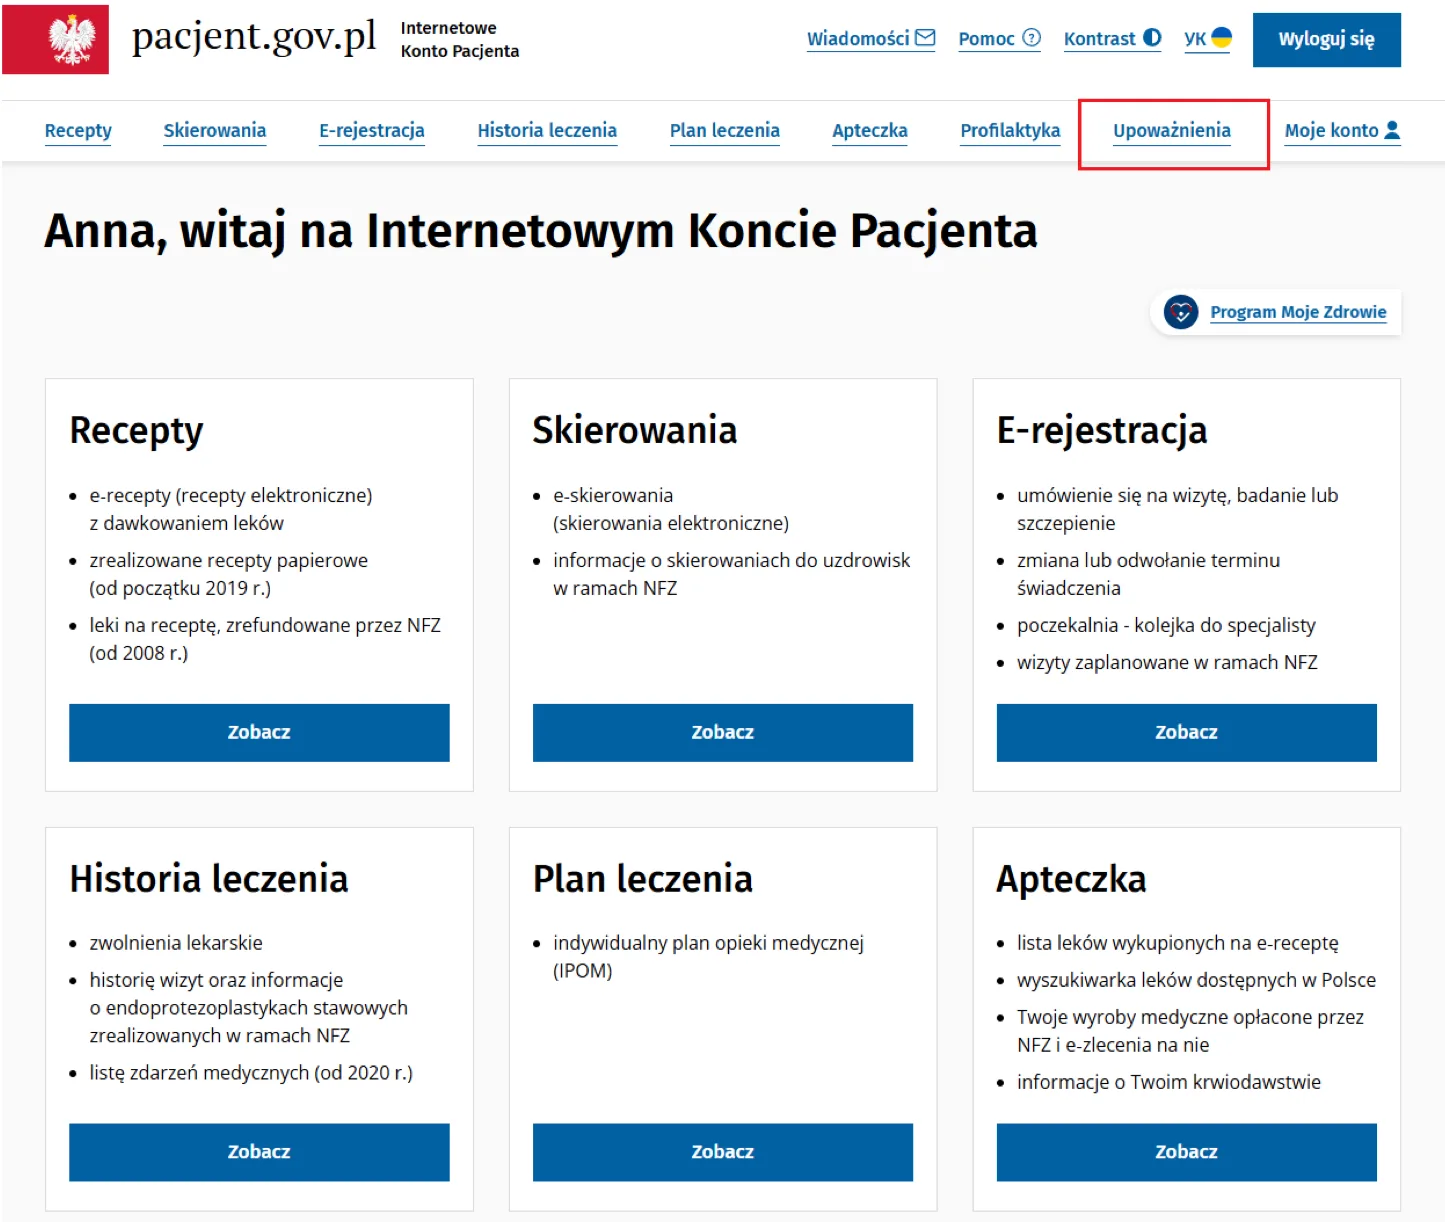
In the top menu click “Upoważnienia” (authorisations; in older versions: “Uprawnienia”).
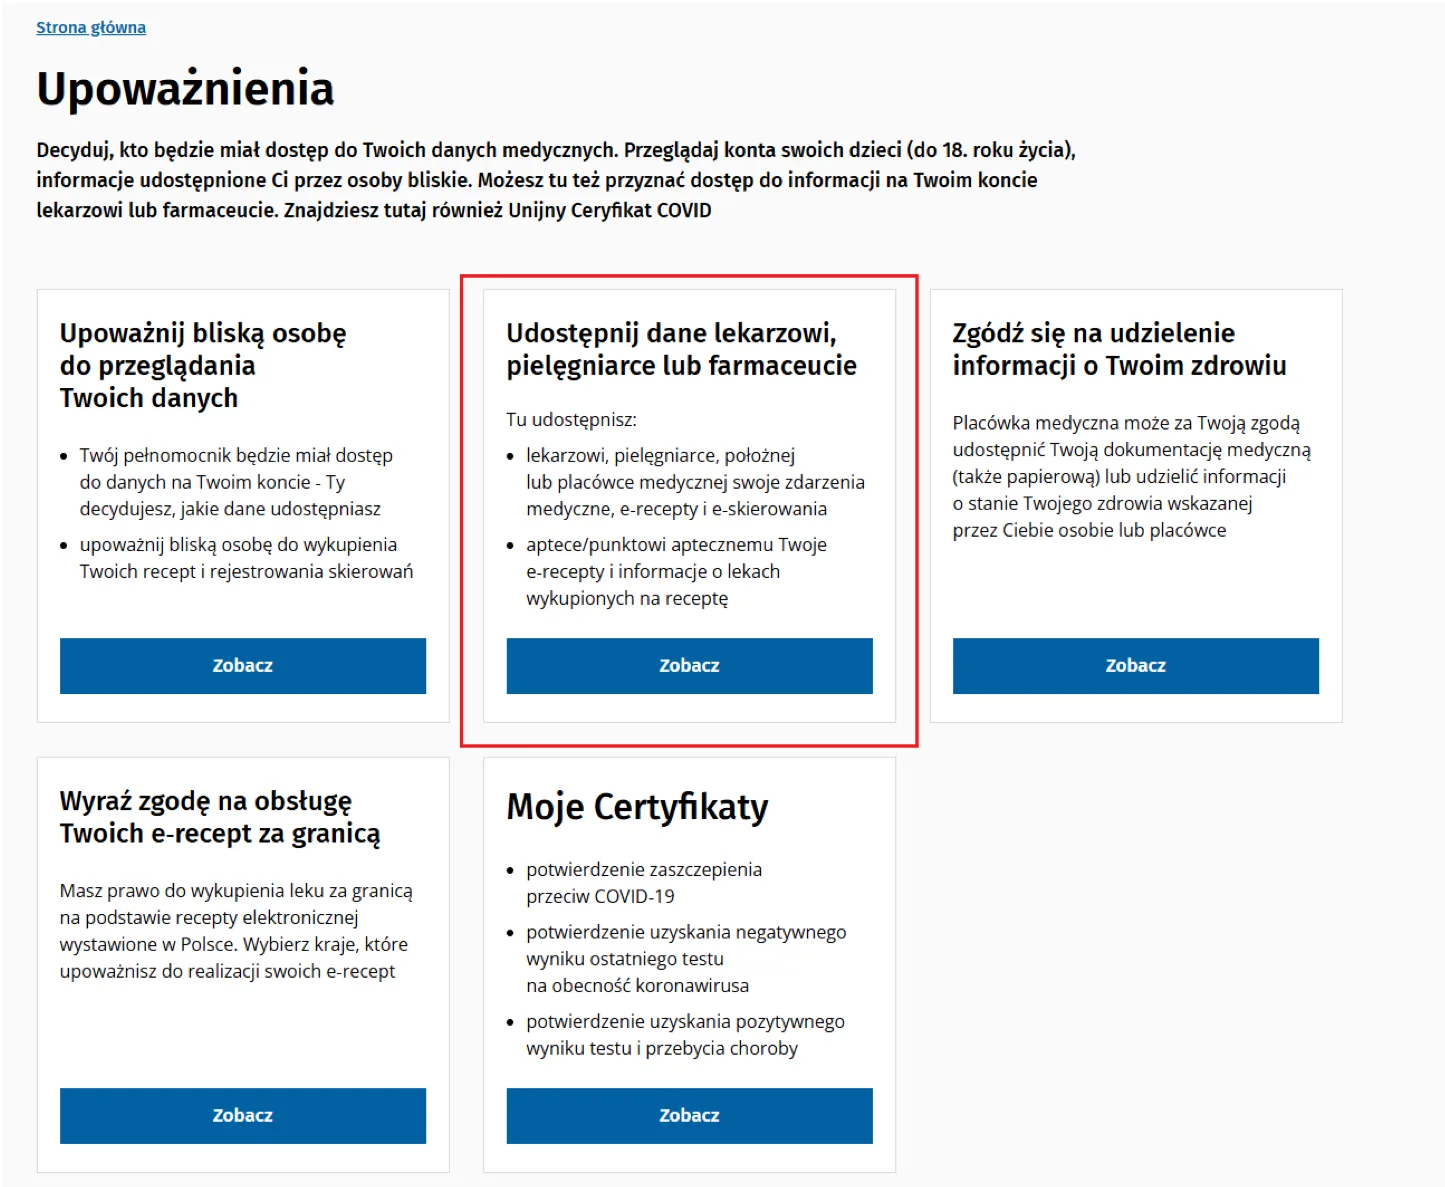
This tile shares your data with a doctor, nurse or pharmacist. Click “Zobacz” (view) on it. Do not confuse it with the tile “Zgódź się na udzielenie informacji o Twoim zdrowiu” — that is a different consent.
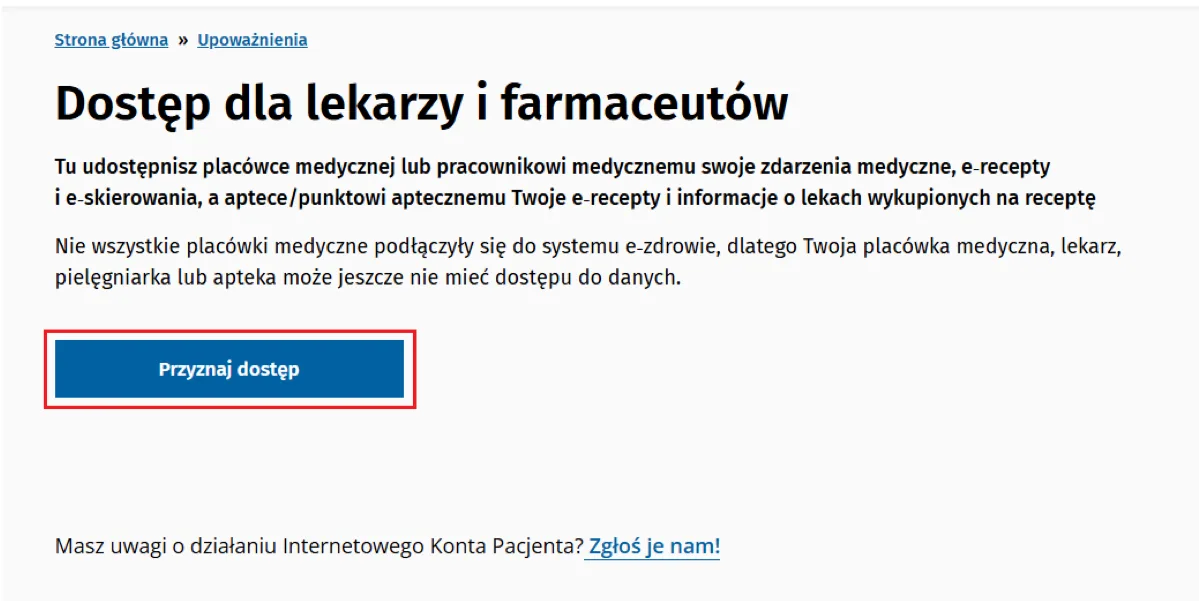
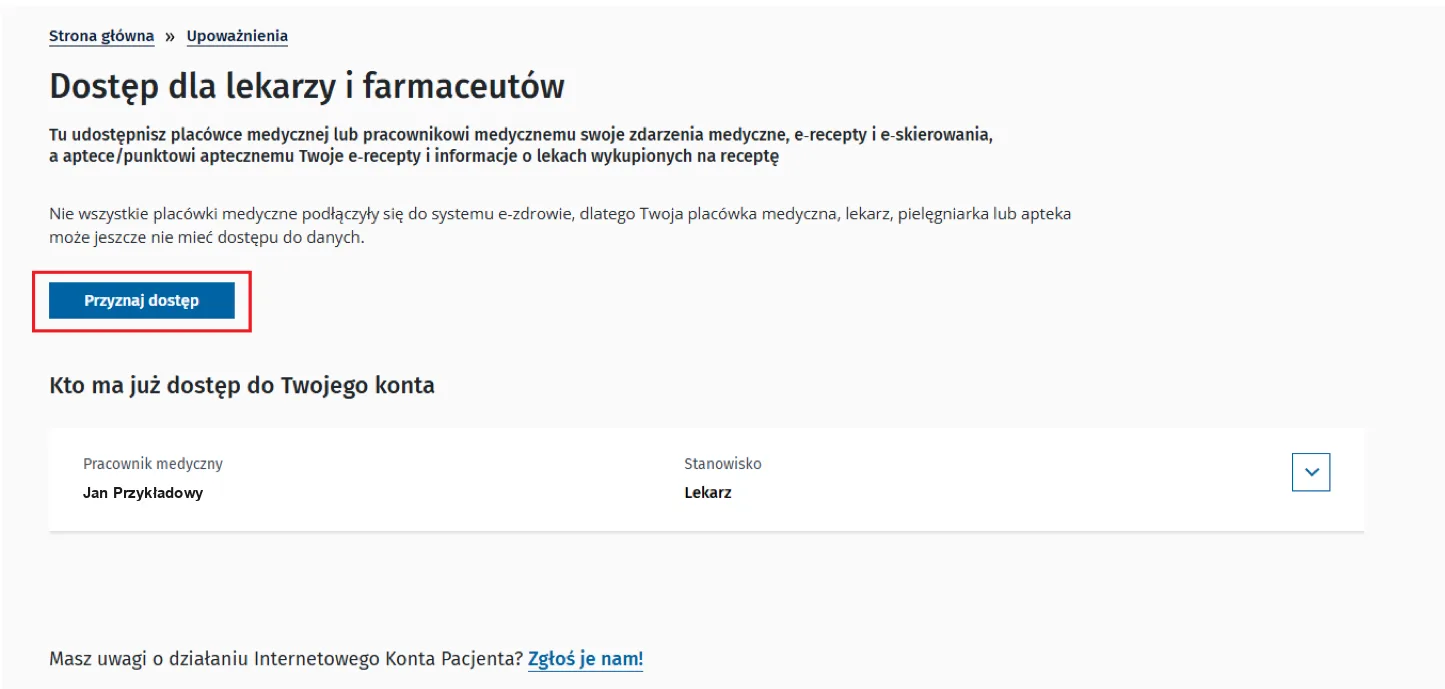
On the page “Dostęp dla lekarzy i farmaceutów” click “Przyznaj dostęp” (grant access).
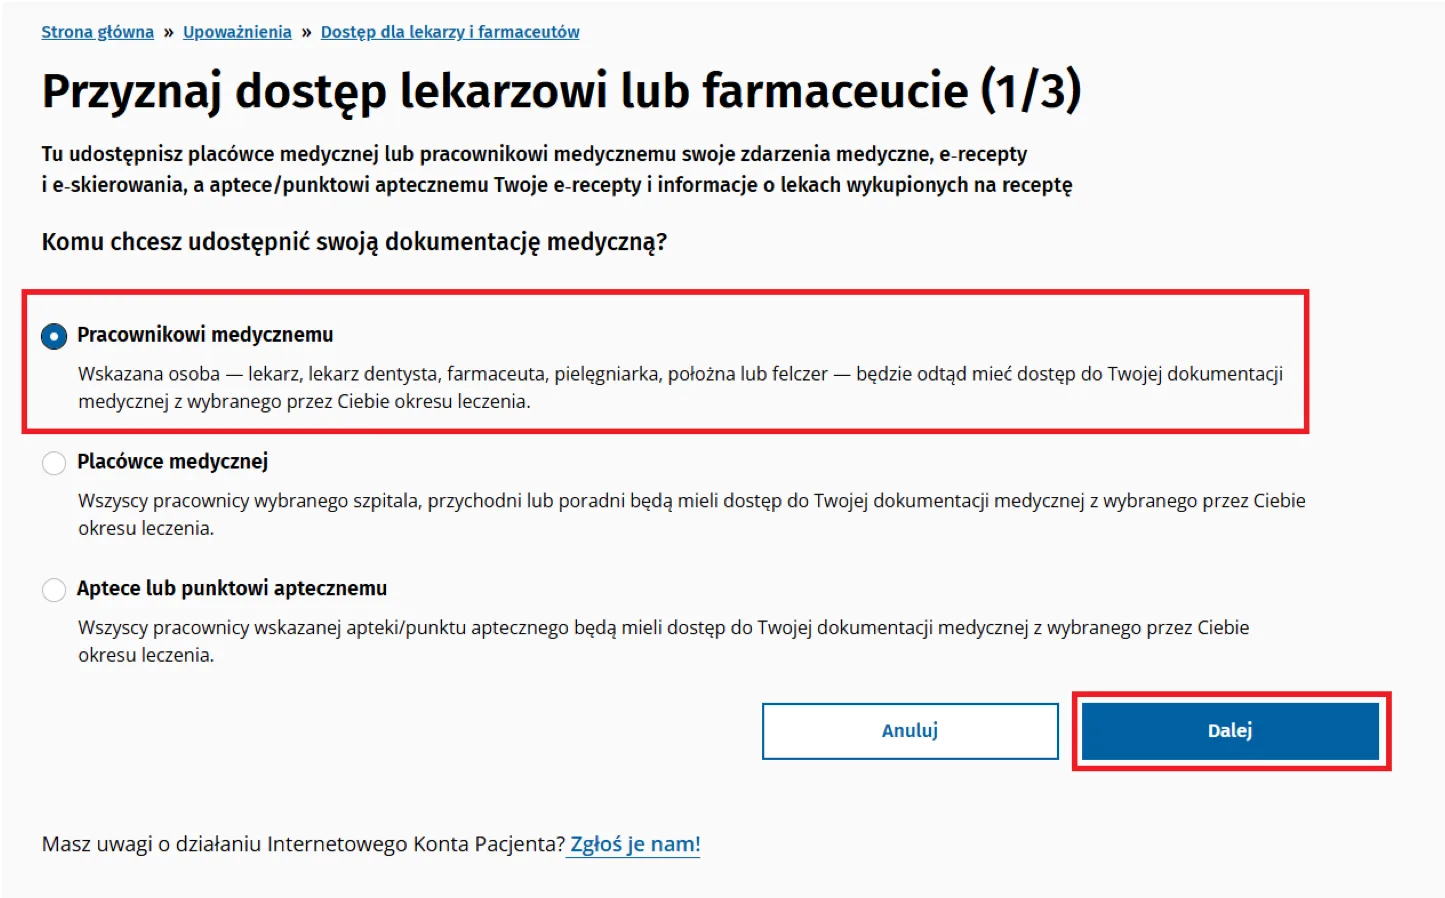
Tick “Placówce medycznej” (medical facility) to give access to the whole clinic, or “Pracownikowi medycznemu” (medical professional) for a chosen doctor only. Click “Dalej” (next).
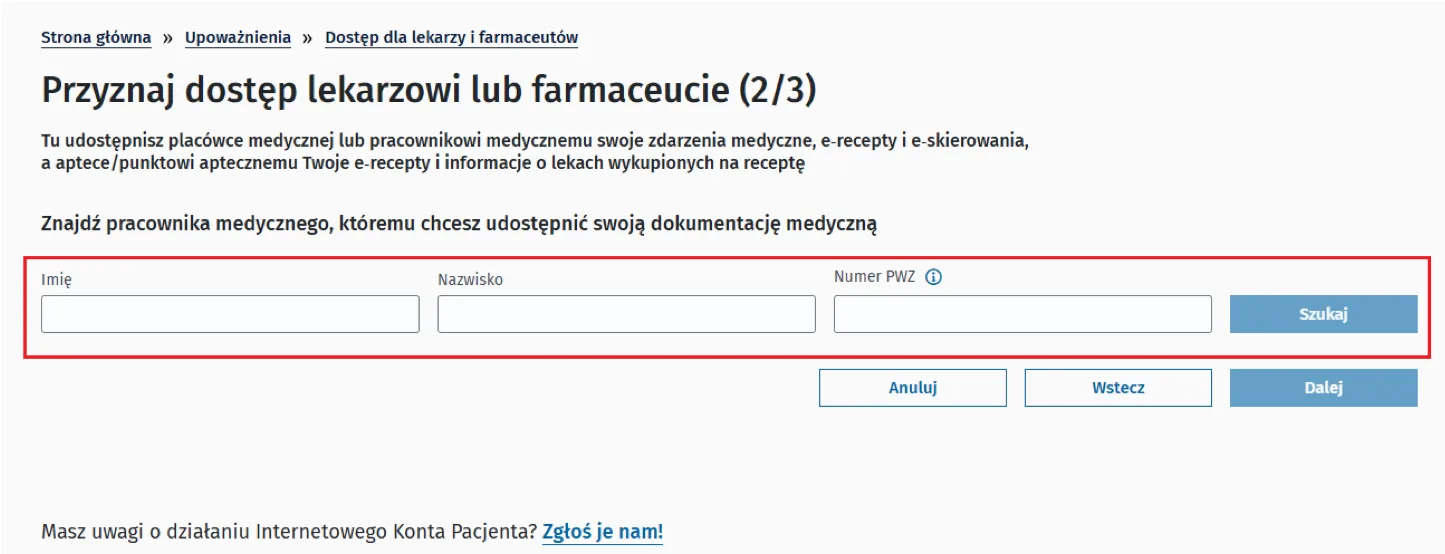
For a facility, enter its name and address (see “What to enter to find our clinic” above). For a doctor, enter the first name and surname or the PWZ number — as in the screenshot. Click “Szukaj” (search).
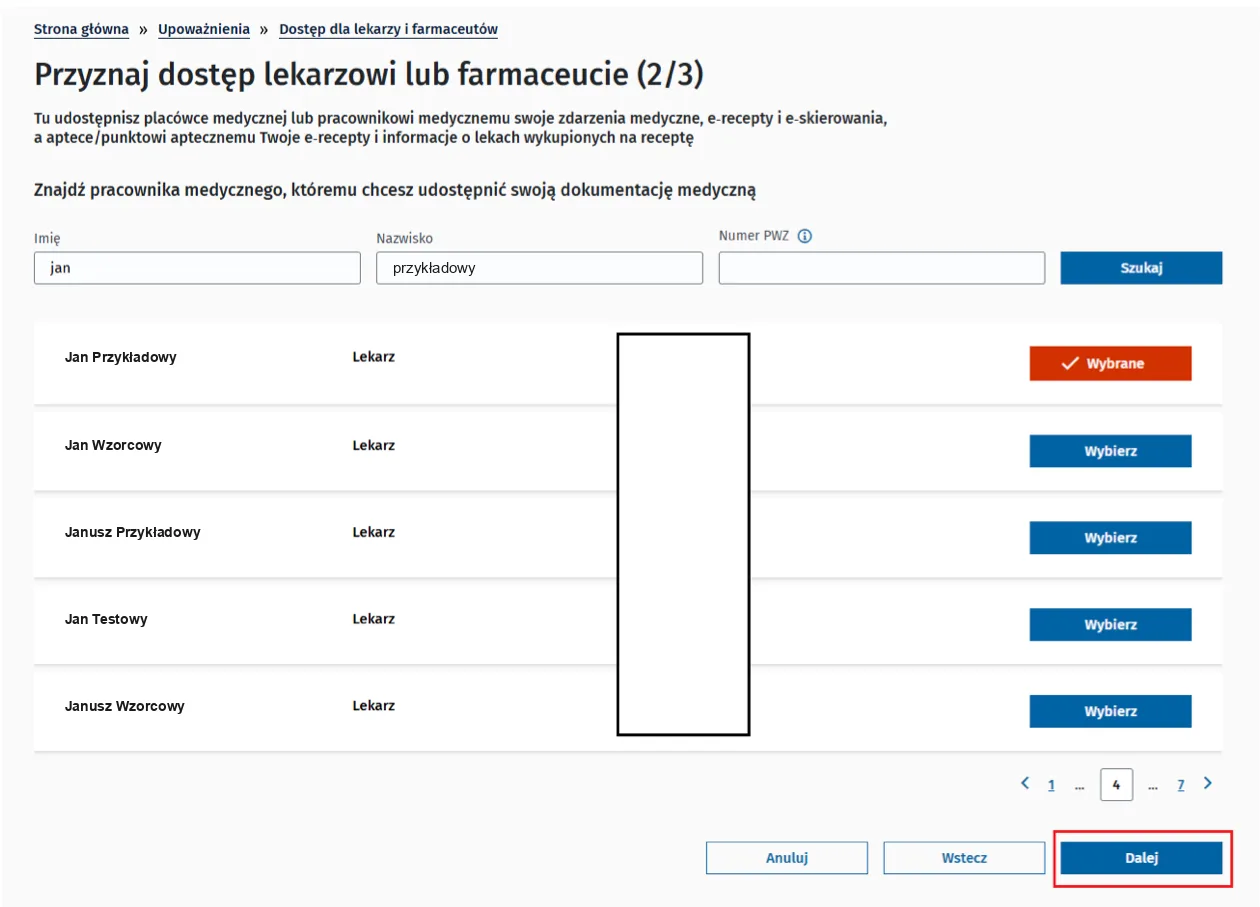
Next to the right facility or person click “Wybierz” (select) — the button changes to “Wybrane” (selected). Then click “Dalej” (next).
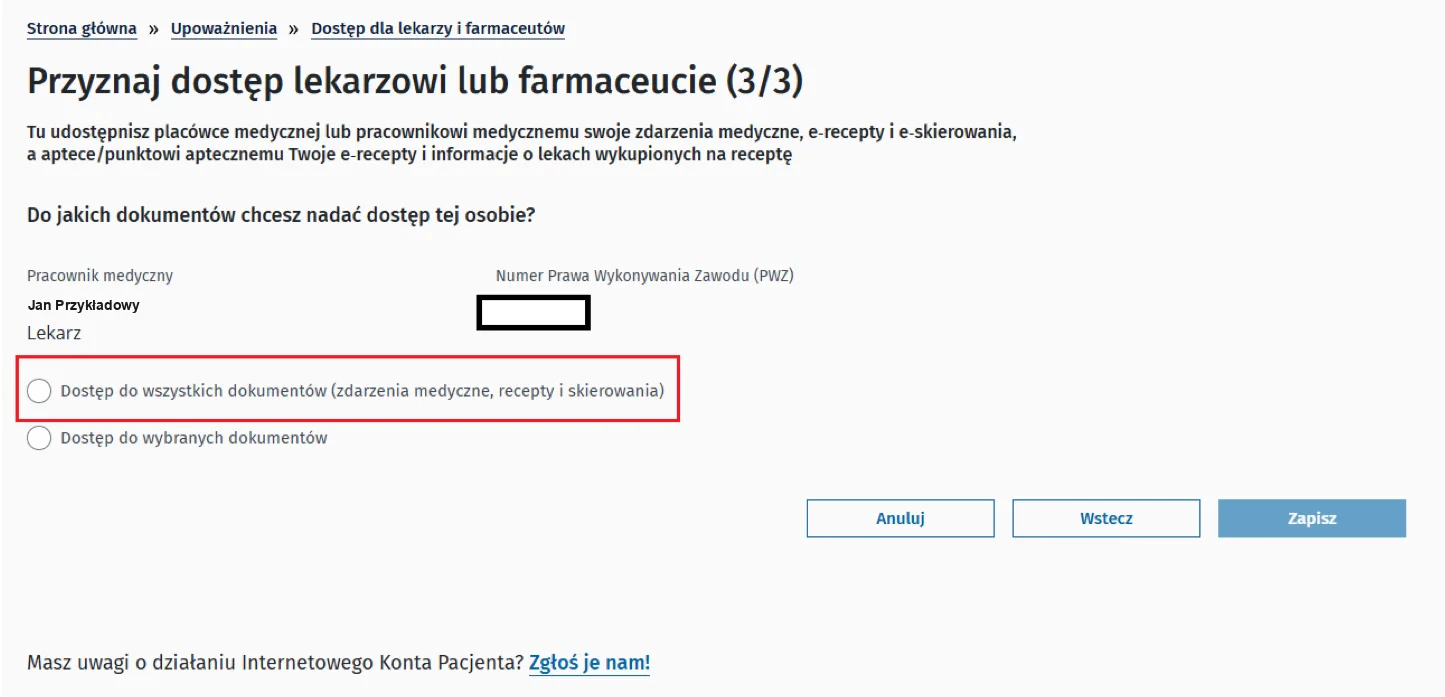
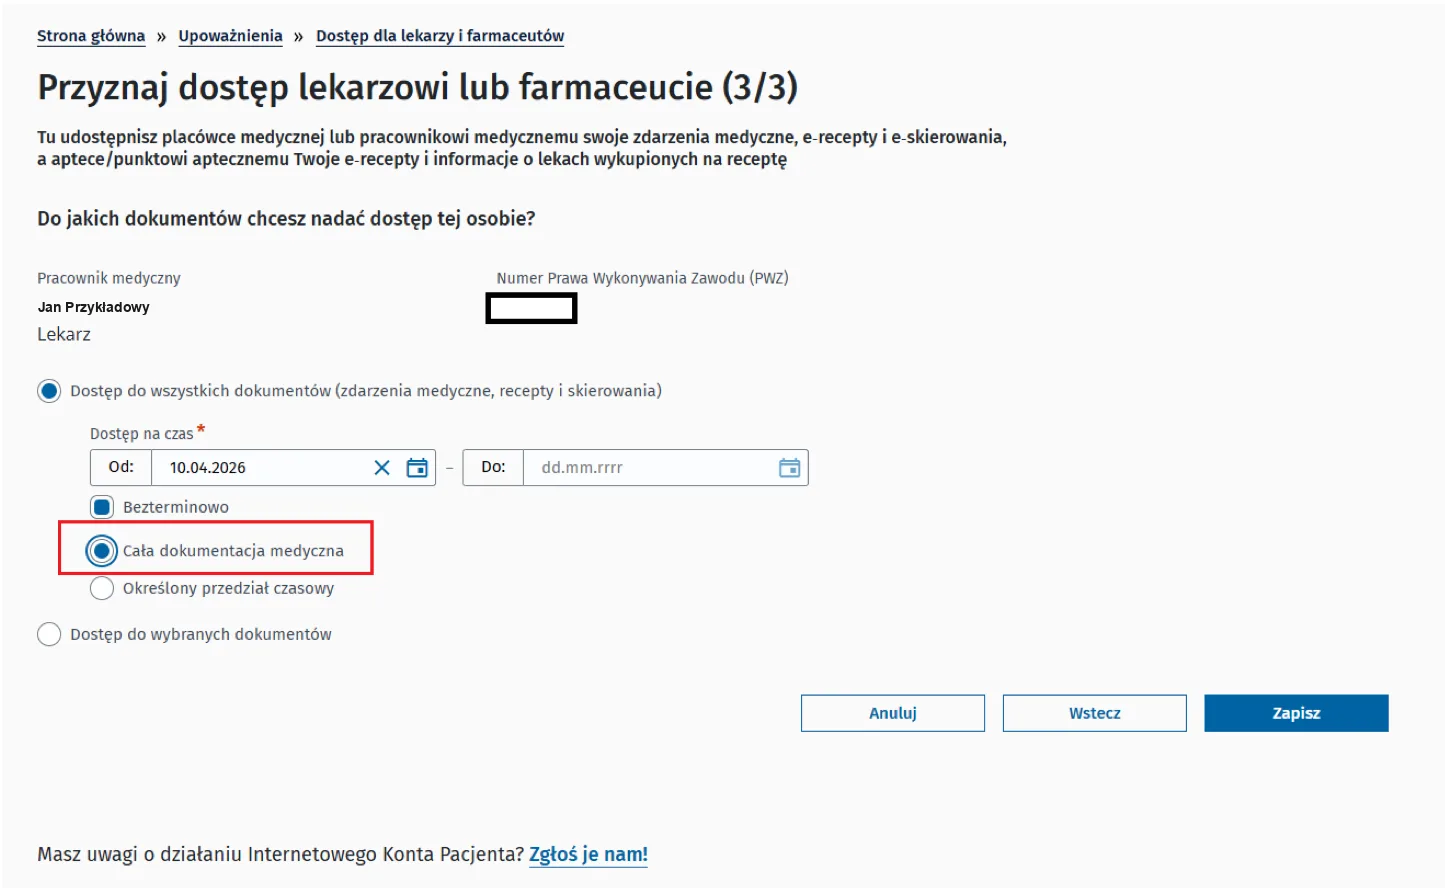
Tick access to all documents (medical events, prescriptions and referrals) or access to selected documents only.
In “Dostęp na czas” (access period) enter the “Od” (from) and “Do” (to) dates, or tick “Bezterminowo” (no end date).
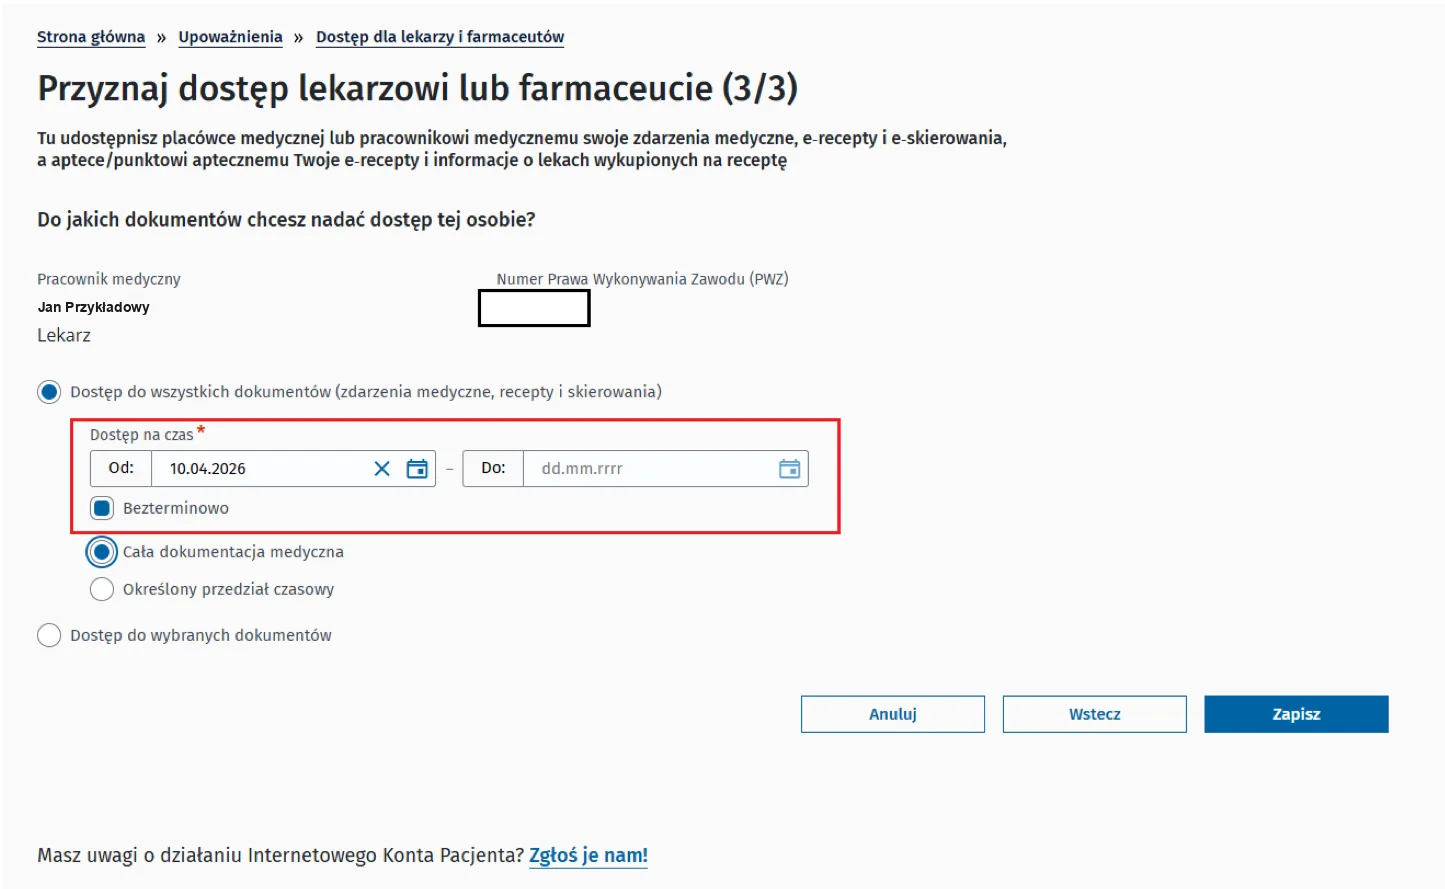
Tick “Cała dokumentacja medyczna” (the whole medical record) or “Określony przedział czasowy” (a set time range). Click “Zapisz” (save). No signature is needed — access works at once.
The clinic or the doctor appears on the list “Kto ma już dostęp do Twojego konta” (who already has access). Here you can change the scope (“Edytuj zakres dostępu”) or withdraw access (“Usuń dostęp”) at any time.
Download the free mojeIKP app from Google Play or the App Store. On the first start log in with a trusted profile, mObywatel or your bank and set a PIN. The screens depend on the app version: screenshots marked as illustrative come from an older version, and button names may differ slightly.
Open the app and enter your PIN. On the start screen or in the “Zdrowie” (health) tab tap the “Upoważnienia” tile (in older versions: “Uprawnienia”). You can also open the menu (☰) and choose “Upoważnienia”.
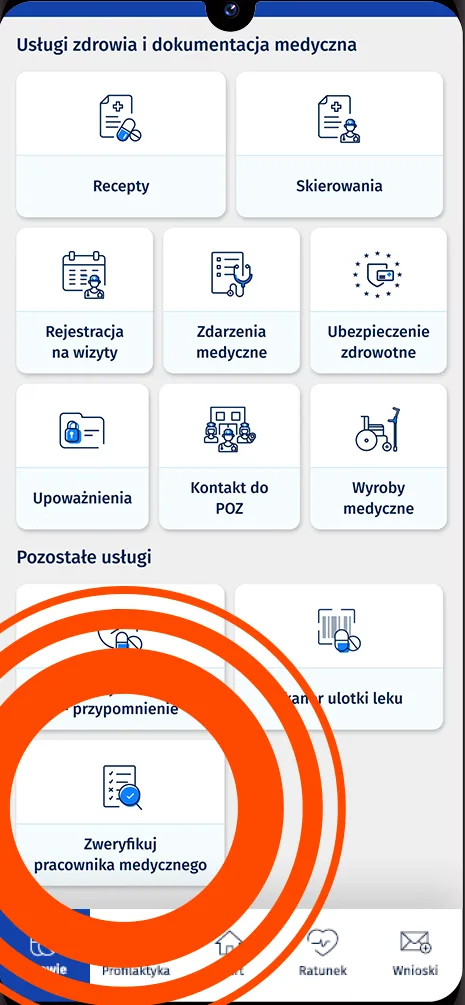
A shortcut to a doctor: the tile “Zweryfikuj pracownika medycznego” (verify a medical professional, highlighted in the screenshot) — find the doctor and go from the result to sharing your data.
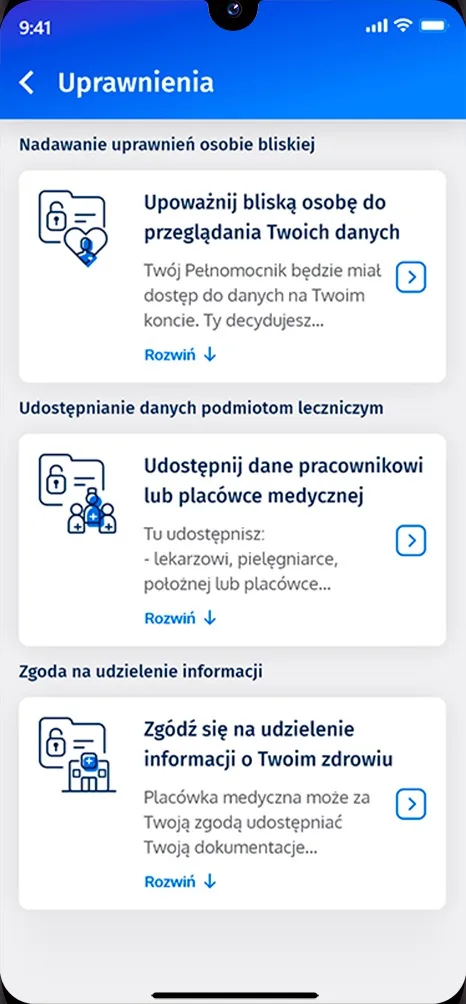
Tap “Udostępnij dane lekarzowi, pielęgniarce lub farmaceucie” (in the older version: “Udostępnij dane pracownikowi lub placówce medycznej”), then “Przyznaj dostęp” (grant access).
Tap “Placówka medyczna” (medical facility) to give access to the whole clinic, or “Pracownik medyczny” (medical professional) for a chosen doctor only.
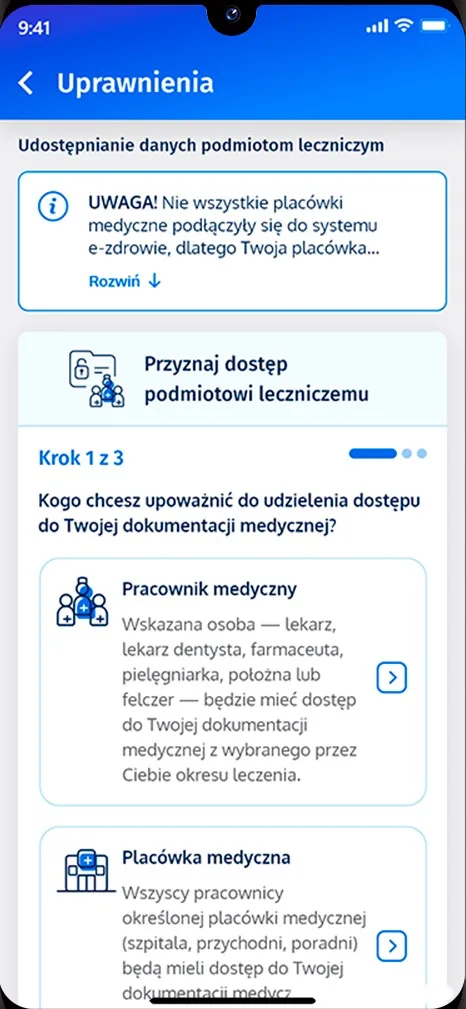
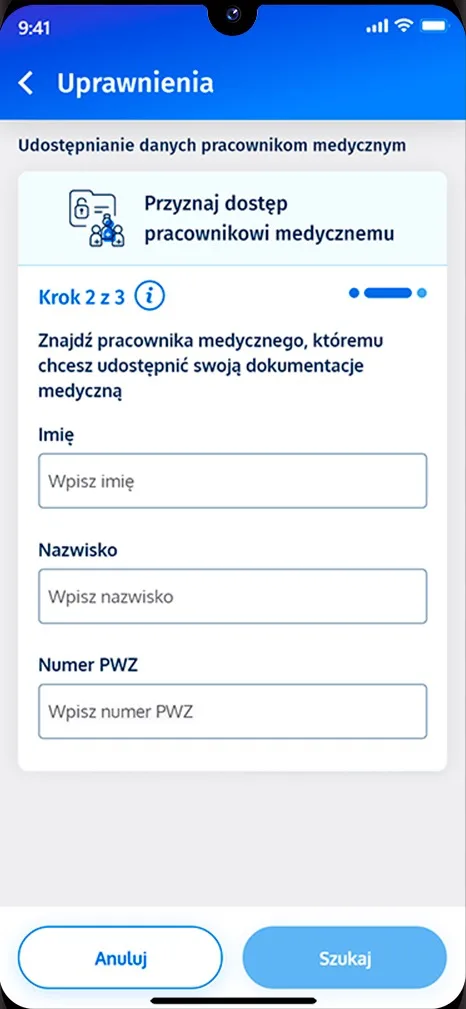
For a facility, enter its address and name, then pick the right one from the list. For a doctor, enter the first name, surname or PWZ number and tap “Szukaj” (search).
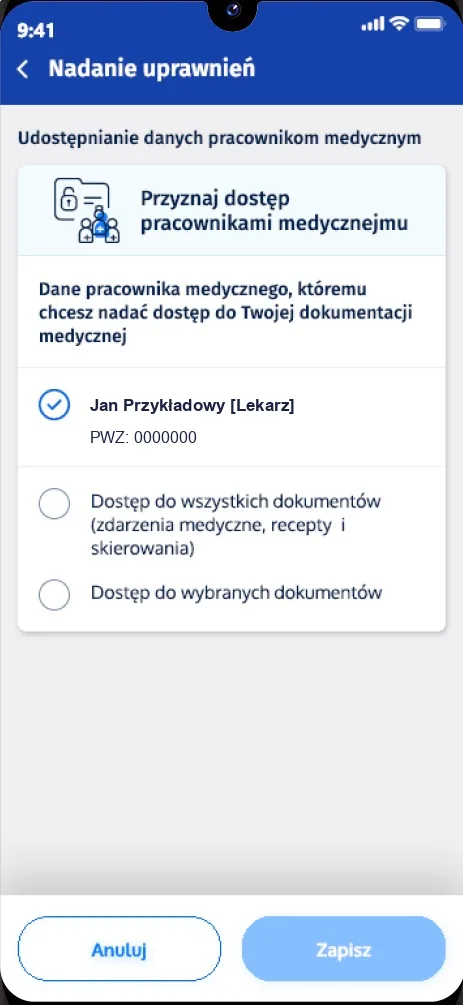
Choose access to all documents or to selected ones, and the period: the whole record or a set time range. Tap “Zapisz” (save).
Go to “Upoważnienia” › “Udostępnij dane lekarzowi, pielęgniarce lub farmaceucie”. Tap the person or facility and choose “Edytuj zakres dostępu” (edit) or “Usuń dostęp” (remove).
No. It is your decision. We will see you for a visit without it too.
Access for a doctor is given to that one person only. Access for the clinic is given to all its medical staff. If several of our doctors treat you, choose the clinic.
You decide. Enter “from–to” dates or tick “Bezterminowo” (no end date). You can also limit access to selected documents or to a selected period of treatment.
Go to “Upoważnienia” › “Udostępnij dane lekarzowi, pielęgniarce lub farmaceucie”. Choose the person or facility on the list and click “Edytuj zakres dostępu” (edit) or “Usuń dostęp” (remove). The change works at once.
Yes. The data is kept in the state system run by Centrum e-Zdrowia. Only you decide who has access, to which documents and for how long. You see every access you have granted on the list in the IKP.
Everyone with a PESEL number has an IKP — just log in on pacjent.gov.pl with a trusted profile, an e-ID card, the mObywatel app or your bank. The IKP helpline for technical questions: 19 239.
Check that you chose the right facility or doctor and that the access has not expired. Not all facilities are connected to the e-health system yet — if in doubt, ask our reception.
It is a different consent: it lets a facility give information about your health to a person you name, e.g. a family member. To share your data with a doctor, use the tile “Udostępnij dane lekarzowi, pielęgniarce lub farmaceucie”.
A person aged 16–17 can view their IKP but cannot authorise anyone. A parent does it.
Share your data before the visit — the doctor will see it during the consultation. Choose a time online or call us.
Sources (as of November 2026, in Polish): Jak udostępnić dane lekarzowi, Twoje dane medyczne to Twoja własność, Jak upoważnić do swoich danych medycznych (mojeIKP), mojeIKP: sprawdź, komu powierzasz zdrowie — pacjent.gov.pl; Podręcznik użytkownika e-Profil Pacjenta – Udostępnianie danych medycznych w IKP — Centrum e-Zdrowia, 15.04.2026.
Screenshots from pacjent.gov.pl are shared under the CC BY 3.0 PL licence (terms of use of the portal content); we cropped them to the phone screen and replaced the doctor’s data with sample data on one of them. In the screenshots from the Centrum e-Zdrowia manual we replaced the doctors’ names with sample names.


